Removing an invoice number from a job
09/02/16 - Ref A1191
Once an invoice is generated in Job-Tracker, the invoice number is captured at the top of the screen. A copy of the invoice is then saved and is accessible from the Documents/Emails/SMS tab.
The file can be deleted from there, however, the invoice number will still show against the job and Job-Tracker will believe that the invoice has already been produced. To remove the invoice number, exit the job and access the ‘Control Panel’. From the control panel, select the ‘Maintenance’ Tab. Then from the boxes on the left-hand side, select ‘Database Utilities’. In this new screen, type in the job number in the 'Job No.' field at the top left of the screen.
Click 'Clear Invoice' and a confirmation box will then appear.
Click OK, then close down all the Control Panel windows and return to your Job Screen.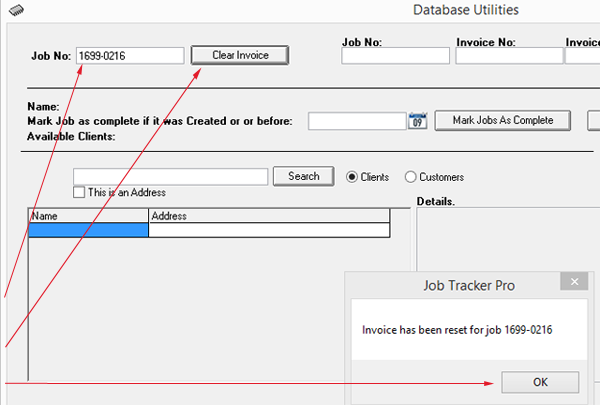
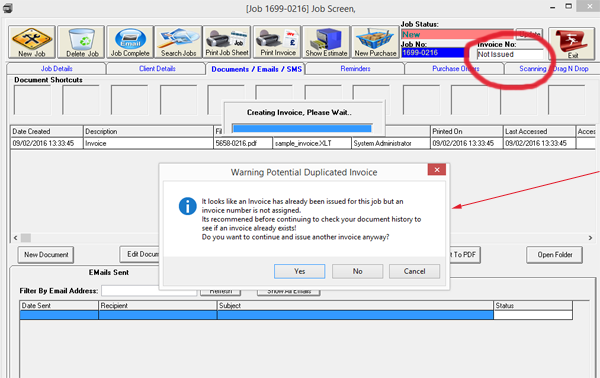
You will now see that the invoice number field shows ‘Not Issued’. If you go to the Documents/Emails/SMS tab you will see that a copy of the previously issued invoice is still available (unless you have previously deleted it). If you click Print Invoice whilst this document still shows in the list, a pop-up box will appear prompting you to check your actions.
NOTE - Once you create a new invoice, the ‘Invoice Number’ field will show the new invoice number. The invoice number previously generated will now not be in use. If it is necessary for you to use that invoice number you can reset the counters within Job-Tracker, more details on how to do this are available in the video - Resetting The Invoice Number